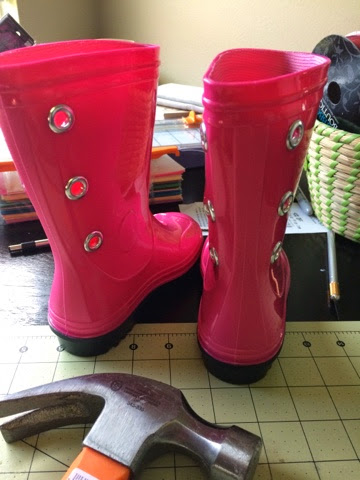
My three year old daughter LOVES boots. She is almost as thrilled about cute shoes as I am, which is both adorable and difficult. For example, do you know how hard it is to find tennis shoes that tie in a child's size 10? It's hard. It's also hard to find cute boots but when I do, she wears the life out of them. She still occasionally tries to force herself into an especially cute pair from a year or so ago that we agreed I made her agree to give to her younger cousin.
So when my friend showed me the idea of personalizing rain boots I jumped at it! A perfect pair of indestructible boots that she can add her own unique personality to, and change as often as she'd like? Sign me up.
Did I mention that it only takes about 30 minutes, only cost me about $15 (including the cost of the boots) and you can do it for adults boots too?
This is all you need:

Rainboots I bought these for about $11
Eyelets They come in different sizes and colors, I bought a 12 pack for $2
Eyelet Tool Another whopping $2
Exact Knife
Hammer
Ribbon Each boot used about 18-20"
Sharpie
Ruler
Start out by deciding where you want your eyelets and how many you want. I decided to put three on each side and I placed them an inch and a half apart.
Then cut out holes where you want your eyelets to go. I recommend an exacto knife because the blade is sharp but small enough to make the little holes that you need.
This is also where you have the option of cutting a slit straight down the middle of the back of your boot. A lot of adults choose to do this, so it gives you room to fit your pants, socks and calves comfortably in your boot. I chose not to because Alexis has tiny little legs and doesn't need extra room.
Next, put your eyelets in the holes and use the tool to hammer them down. This part gets a little tricky if you choose not to cut the back of your boots, so for the first 3 on each boot I just fed the eyelet tool through the opposite hole so that I could hammer it that way.
Like so:
With the last three on each boot, you just have to hammer the tool through the rubber of the boot. It didn't cause any damage or cosmetic blemishes to these boots, so I wouldn't worry about that, as long as you aren't hammering too hard.
Now that you have the eyelets hammered into the boots you're ready to pick out your ribbon! I chose black ribbon to match the black soles of these boots, but as you can see, I have lots of options and I'm sure the ribbon color will change in these boots frequently!
Lace the boots up, trim the ribbon and burn the ends and voila!
You now have an adorable, unique pair of boots! I've also played around with the idea of doing eyelets along the top of the boot and weaving ribbon up there, so I might have to get a second pair and try that out.. If you have any questions, or other ideas for personalizing or upcycling boots, let me know!


1 comment:
Absolutely adorable! I see Becca doing this to her zebra rain boots!!
Post a Comment